Wednesday, January 26, 2011

Hardware … Repurposed

While working on updating the kitchen, I REALLY wanted to get new pulls and knobs.  I’ve always heard it’s an inexpensive way to really change the look of a kitchen.  That and the brass ones I have are getting pitted after 8 1/2 years of use.  So I went shopping.  With 21 pulls and 17 knobs there was no “inexpensive” about it.  Even if I settled for $4-ish replacements, that would have been well over $150! 


So I went to the spray paint aisle.  And bought this:

UN_SatinBlack_SP_L

It was around $8.00. Rust-oleum Satin black spray paint.  No primer needed, just a little scuffing with sandpaper.

I took all the knobs off, screwed them to cardboard and did 3 light coats, careful to make sure I got it on the under side too.  (I did have to touch up about 6 of them on the underside)

Befores: (I don’t have pictures of the island…let’s just say the cleaning fairy is fired)

IMG_2811

IMG_2812

IMG_2816

And the afters:

IMG_2819

IMG_2817

Completely new look, $8.00 and a little bit of time.  Not bad if I do say so myself!

Linking up at these fabulous parties!

Night Owl Crafting, My Backyard Eden, Creations by Kara, Someday Crafts, Sister's Stuff, Blue Cricket, The Trendy Treehouse,

Wednesday, January 19, 2011

Fun Little Boy Quilt

My kids love quilts.  I made a big one that is kept in the living room and we usually fight over it, or race to be the first to lay claim on it. 

So since it only took me 6 years to make that one (Long story, but 182 applique petals.  Enough said.) I decided to make one for each of the kids rooms. I waited until the snuggle flannel was on sale at Jo-Ann’s (back in October, but it goes on sale frequently) and spent close to 2 hours browsing and choosing fabrics that reflect their personalities. 

IMG_2076

I found a pattern for this on McCall’s Quilting website for a full sized quilt.

It said beginner, so I thought maybe I could actually complete it in a timely manner.  I cut the pieces out for my son’s quilt right after I bought the fabric, but took a long break around the holidays.  I picked it back up last week and banged it out completely in about 3 or 4 good days worth of work (not the whole day!  Just a few hours here and there!)

The instructions show some of the blocks turned around.  I made mine all the same (2 different 12 x 12 blocks) and kept them all turned the same direction.IMG_2786

I decided to tie the quilt instead of traditional quilting because it would be faster and I thought it would be cute.  But I’m not a huge fan of regular yarn, so I picked out some 4 thread yarn called Lily Sugar ‘n Cream Twists that I got at Hobby Lobby. 

After pinning the top, the batting and the backing flannel all together about every 6 inches, I put a tie at each of the 4 corners per block and one in the center. 

I spent 2 nights finishing the binding and was able to cover Pierce up with his new quilt while he slept last night.  He was so excited it was done!


IMG_2784

Now if I can get Camryn’s finished in a timely manner!  I’m off to go start cutting!

Tuesday, January 18, 2011

Honey Wheat Bread

You just can’t beat fresh bread.  A little secret?  When it comes out of the oven, I slice some off warm and eat it without even adding anything on top.  I don’t need it, and I’m too impatient to sample the bread to take the time to spread something on top.

My grandma gave me a bread maker last year that was in her closet, still in the box.  That changed my bread making ways.  No more kneading and messes of flour.  (Although I do find that somewhat therapeutic)  I don’t however bake the loaf in the bread machine, I just use the dough cycle and put it in the oven. 

But you can do whatever makes you happy.

IMG_2667


Since the grocery stores in my area insist on not selling the healthy bread I like anymore, I have begun a quest to make all of my own bread.  No more store bought.  Cheaper, healthier, tastier.  Win, Win, Win.  I know the recipe by heart now and bake one loaf a day, sometimes I can skip a day but usually not; we like carbs. 

I found a recipe at allrecipes.com and tweaked it to my liking and wanted to share it with everyone.

Honey Wheat Bread

  • 1 1/8 cup warm water
  • 1/4 cup honey
  • 2 Tablespoons oil (I use canola)
  • 1/3 teaspoon salt
  • 2 cups whole wheat flour
  • 1 cup bread flour
  • 1 1/2 teaspoons yeast

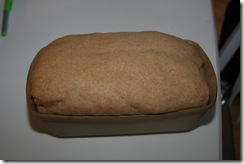
Put the ingredients in the bread machine pan in order listed.  If you chose to bake it, set your machine and go.  If you just use the dough cycle, after it is complete, dump the dough into a greased loaf pan, spread it out a little and cover with a kitchen towel to keep it from drying out.  Let it rise for about 45 minutes to an hour until it’s domed up pretty.IMG_2674

Bake for 20-25 minutes at 350.  The loaf is done when it’s pretty brown on top and it sounds hollow when you tap the top.  

Enjoy however you wish.  I prefer it plain or with homemade red raspberry jam. Or a sandwich is good too. Mmmmm!

bread

Sunday, January 16, 2011

Custom Made Glass Tile Backsplash

So it’s been a while since I last blogged.  But great things take great amounts of time.  I’ve been obsessing over tiling the backsplash in the kitchen for about a month now.  This is what I had:
IMG_2680
And while the vinyl quote was quite fitting for my kitchen, it was time for a change.
I was greatly discouraged when I couldn’t find red glass tile that a.) I liked and b.) didn’t cost a fortune ($20+ per square foot!).  So I came home and started searching the internet for ideas.  Why can’t I just make my own glass tile? 
Well, it seems that not much will stick to glass.  You can’t simply paint the back of the glass because it will pull off and make a mess.  You could buy special paint, but it’s over $200 for a gallon and I don’t need that much for this project. Hmmm, what to do.  Then I stumbled on alcohol inks.  They are made by Ranger and are called Adirondack Inks.  Youtube had a few videos of people inking glass vases and the like, but no tile. 

ink
So I took my coupon to Michaels, and bought two packages of inks that had different shades of red in them.  Apparently you can buy individual bottles online, but I couldn’t find any like that locally, so I just bought the 3 packs.  I used “currant” and “cranberry.” 
I went to a local glass cutting place who was generous enough to give me 3 tiles to practice on.  I colored a couple of them and glued them to a scrap piece of wallboard and I loved it!  Next I drew up a blueprint on graph paper for how I would mix the glass tiles with some tumbled marble tiles.  I got boxes of tumbled marble tiles at Lowe’s for $50.  I ordered 34 more glass tiles for just over $50.
The tiles are all 3 x 6 subway style tiles, but the tumbled marble are about 3/8 inch thick and the glass are 1/4 inch thick. 
I set about inking all of the glass tiles.  This task goes pretty quickly because the ink dries in about a minute.  I used the ink applicator that is sold separately and just dabbed all over using 5 drops of Currant and 2 drops of Cranberry for each coat per tile.
 IMG_2723
After about 5 coats, the color was deep enough for me.  *Note, there will be some lint that comes off the felt applicator.  It is okay, you don’t have to rush to remove all the ink and start over.  Seriously, learn from my rash mistake!  You can lighten and blend using the alcohol solution they sell, but I didn’t like it as much, but did use it to correct any errors.  Oh and wear rubber gloves, because it stains your hands. 
IMG_2730
The tiles are somewhat transparent still, but will be put against white tile adhesive.
IMG_2732
When it’s time to tile, find the center and start placing tiles.  I used 1/8 inch spacers, and with the help of my husband got done a lot faster than if I had to do it alone!
The adhesive behind tile is usually spread with a notched trowel.  We did that behind the stone tiles, but behind the glass tiles we used smoothed it out so there wasn’t air pockets behind the glass that could be seen. It is very important to lay the glass with the colored side against the adhesive.  This way it won’t get worn off over time.  I did find the adhesive did pull the ink off if you rubbed it around, so just place and push.  Don’t butter the back of the tiles with the adhesive either, big pink smears is all I’m going to say.
IMG_2737
After all the tiles are hung according to plan:
IMG_2745
And the smaller section between the corner and the refrigerator:
IMG_2749
Today was grouting day.  The stone is porous and has small holes that we wanted to fill with grout so they don’t get filled with kitchen mess.  So we first wiped the fronts with a wet cloth to prevent the faces of the tiles from soaking in too much of the grout and then my hubby went to work pressing grout into the spaces and holes.  Instead of the normal rubber float though, he found with such small spaces, good old messy hands worked better.  I followed behind and wiped them off and down, smoothing the lines as I went.
IMG_2763
And the almost finished project (still need to wipe off the haze, seal the tile tomorrow and put the outlet covers back on)
I’m totally in love.  I love the imperfect look to it, and that is surprising with my type A perfectionist tendencies.  I also love that it is completely a creation of my own and it executed into reality exactly how I imagined.
IMG_2769
IMG_2770
IMG_2777
Hope you love it as much as I do, if you do follow my page or fan me on Facebook!

I'm joining a few link up parties throughout the week to try to increase my traffic, and because I think these tiles are gorgeous and should be shared throughout the world.  These are some of my favorite places, check them out for more crafty inspiration!

Mad in Crafts, A Little Lovely, I Heart Naptime, Under the Table and Dreaming,
Simpsonized Crafts, Making the World Cuter, Between Naps on the Porch, Craftomaniac, Skip to my Lou, Sumos Sweet Stuff, Dittle Dattle, Little Eme, Funky Polkadot Giraffe, All Thingz Related, Todays Creative Blog, Hope Studios, Sugar Bee - Craft Edition, Boogie Board Cottage, My Backyard Eden, Someday Crafts, Creations by Kara, The Trendy Treehouse, Blue Cricket Design, Lil Luna, Sisters Stuff

Thursday, December 30, 2010

Weekly Menu Board

I’ve been a meal planner for years.  I have changed my methods as the situation suits.  Before kids when I worked full time, I would plan for about 3 weeks at a time.  Now that we have kids, are more health conscious, and are buying more fresh foods, I shop about once a week so I plan for about 7 or 8 meals at a time. 

This helps a ton with the shopping.  Execution…not so much.

It seems that I always forget to thaw something or don’t get the stuff in the crock pot early enough on days that I’m planning a slow cooker meal. 

I usually write down a tentative menu and put it on my fridge, but it’s so small, I rarely look at it on a regular business and just try to commit it to memory. 

Big fail this week.  I thawed a whole roaster chicken, a chuck roast, and a sirloin roast all this week and have failed miserably at getting them cooked.  (come on!  The sirloin roast is supposed to take 8-10 hours!  That’s a lot of forethought!)

So I’ve seen different “dry-erase” menu boards across the blogosphere like this one at Under the Table.  So I put my own spin it tonight and it took me all of an hour to make. 

I found this art frame at Wal-Mart for $14.00.  It’s 12 x 16 inches.  Nice and big

IMG_2616

It swings open so you can store more kids art behind the frame, but instead I’m going to take advantage of the space and store the recipe cards for any recipes that I need that week.  Then they aren’t being moved all over the kitchen throughout the week after I pick them out. 

IMG_2640

I bought a couple different fabrics at Jo-Ann’s.  The red one is like the material of reusable grocery bags that are being sold EVERYWHERE.  I was kind of surprised that they sold this kind of fabric and will have to file that away in my head for future use. 

The white one is some kind of towel fabric.  It’s cotton, has just a little bit of texture, and I was able to fray the edges after I cut the selvage off.  I found them both by the utility/burlap fabric.  That’s all I needed to know.

IMG_2623

I bought a half yard of each for $4.00 total.  I could have used my coupon, but I forgot…oh well.  (There was a lot of extra red because it’s 60 inch wide fabric)

I cut the fabrics down to size, the red to fit snug (12 x 16) and the white an inch smaller all the way around (10 x 14).   I frayed the white edges some and glued them both to the paper sample picture that came in the frame.

IMG_2627

Then using my Silhouette and Core’dinations cardstock, I cut out letters for the title and the first letter for each day of the week.  I lightly sanded the black Core’dinations to show the dark red through on the edges. 

IMG_2629

Space them out where I wanted them (about every two inches down the side) and pop it back in the frame!  Easy Breezy!

IMG_2632

I hung it on the blank end of my kitchen cabinets in a highly visible place using a couple of command hooks.  Then just use a dry erase marker on the glass to write down the meal for each day and it is an instant erasable surface!

IMG_2633

IMG_2636

Now if this doesn’t help me be more organized, then I’m a lost cause!

Sunday, December 26, 2010

Kitchen Canister Set

I have a set of old Tupperware kitchen canisters.  They aren’t really pretty.  But they worked, and I hid them in the kitchen utility garage. 
I also have a glass corner cabinet above that garage.  It has gone widely unused.  There is a ton of space up there, so I mainly stash large bake ware that doesn’t have a home.  And the knives to keep them away from little fingers. 
I never really knew how to make it look right.  I thought about etching the glass on the cabinet, but was a little afraid I would mess it up and then have to call the custom cabinet place and say “whoops!” 
Instead, I found a solution that is functional and pretty at the same time.  This is the first of a several projects I have in mind to upgrade my kitchen décor over the next couple months. 
I started with these large jars found in the craft section at Hobby Lobby (another home away from home for me).  I got two of each size last week when they were on sale 50% off.  They also have a giant sized one that makes an awesome cookie jar that I once made for a gift.  The lids have a rubber gasket on them to keep them airtight.
IMG_2612
Next I pulled out my Silhouette and my brand new red vinyl that I bought when everything was 40% off at the silhouette store on Black Friday weekend. 
I made a simple design in Silhouette Studio using the font “Café Rojo” and some simple brackets that I had in my Silhouette library.
I was blown away by the Studio program when I discovered how to use the “align” tools and line up and center my designs.  “Wow that was easy!” was all I could say.
Next I pulled away the negative portion
IMG_2603
Put the design on transfer paper
IMG_2605
Eyeballed it onto one of the larger canisters
IMG_2608
Pull away the transfer tape and viola!
IMG_2609
Repeat for each jar and fill them with the appropriate baking supplies
IMG_2611
IMG_2613
Put them in the cabinet like so
IMG_2614
I just need to clean the glass (haha) and organize the other stuff in there so it’s farther back in the cabinet and not showing.  It’s really mainly stuff I rarely use anyhow.

Monday, December 13, 2010

Christmas Garland Dilemma

So this year, I wanted a more classic look for the house.  My Christmas décor is mostly made up of cheap stuff that I’ve collected over the years.  I never really bought Christmas decorations intentionally and with a purpose. 
So after browsing many pictures I determined that I needed some good quality greenery/garland.  I have a lot of long surfaces in my house that needed something.  Entertainment center in the living room, china cabinet in the kitchen, space above the cabinets in the kitchen…you get the idea. 
I went on a hunt and was determined to not let money be the determining factor of a purchase because it was something I could use year after year.  And it would make me happy.  Which is priceless.  Well after hunting several craft stores for a couple hours, I was empty handed and sad.  Not only was the garland I found expensive, it just didn’t look good.  It was small and looked fake. 
There is nothing I hate more than the ideas in my head not translating into reality.  It is aggravating beyond words. 
So my husband suggested buying some real garland. 
But but but….it will die and dry out and it’s expensive!  But I was game and tried to let go of my thrifty ways just once. 
We took the kids on a trip to a local nursery Hensler’s nursery and found 25 feet of mixed garland for $32.  Boy was that worth it.  I used it for so much around the house, and since we have an artificial tree, we were able to get some real greenery in the house for less than the cost of a real tree.
Here’s how I used it.
Across the top of the entertainment center, accented with giant poinsettia stems from WalMart.
IMG_2352
Top of the china cabinet with tinsel trees and Christmas subway art.
IMG_2351
Then in the dining room, I draped the chandelier and made the centerpiece from what was left over.
IMG_2327
So at least for now, until I can find garland that is up to my standards, I will be buying a rope of the real stuff, especially since it goes so far!